Showing posts with label log cabin block. Show all posts

Sunday 26 May 2013

The Log Cabin Quilt: Final!

Cast your minds back and you may remember that I used to write a blog here.  I didn't mean to stop writing but I didn't have anything to blog about as I seemed to have lost my sewing mojo.  I have read that this can happen.  Well my mojo has returned and I have some progress to report.

Remember my to do list?

Progress so far:


  • Machine baste around the outside of the quilt a quater of an inch from the edge of the quilt top
  • Trim away the excess backing and batting and square up
  • Cut two and a half inch strips of the red fabric for binding
  • Join strips using 45 degree seams
  • Attach binding
  • Wash, line dry and press

  • That's right!  Only a few minutes ago I put the final stitches into the binding on the quilt.  Thank you to follower Ken who explained how to make my hand stitching invisible.

    Finished log cabin cot quilt (thank you to The-Much-Belovéd for holding it up so well)
    Detail of quilting and binding back and front
    I machined the binding to the front of the quilt and then hand stitched it to the back.  Yes, it took hours!  I am happy enough with the result to make it worth the investment of time.

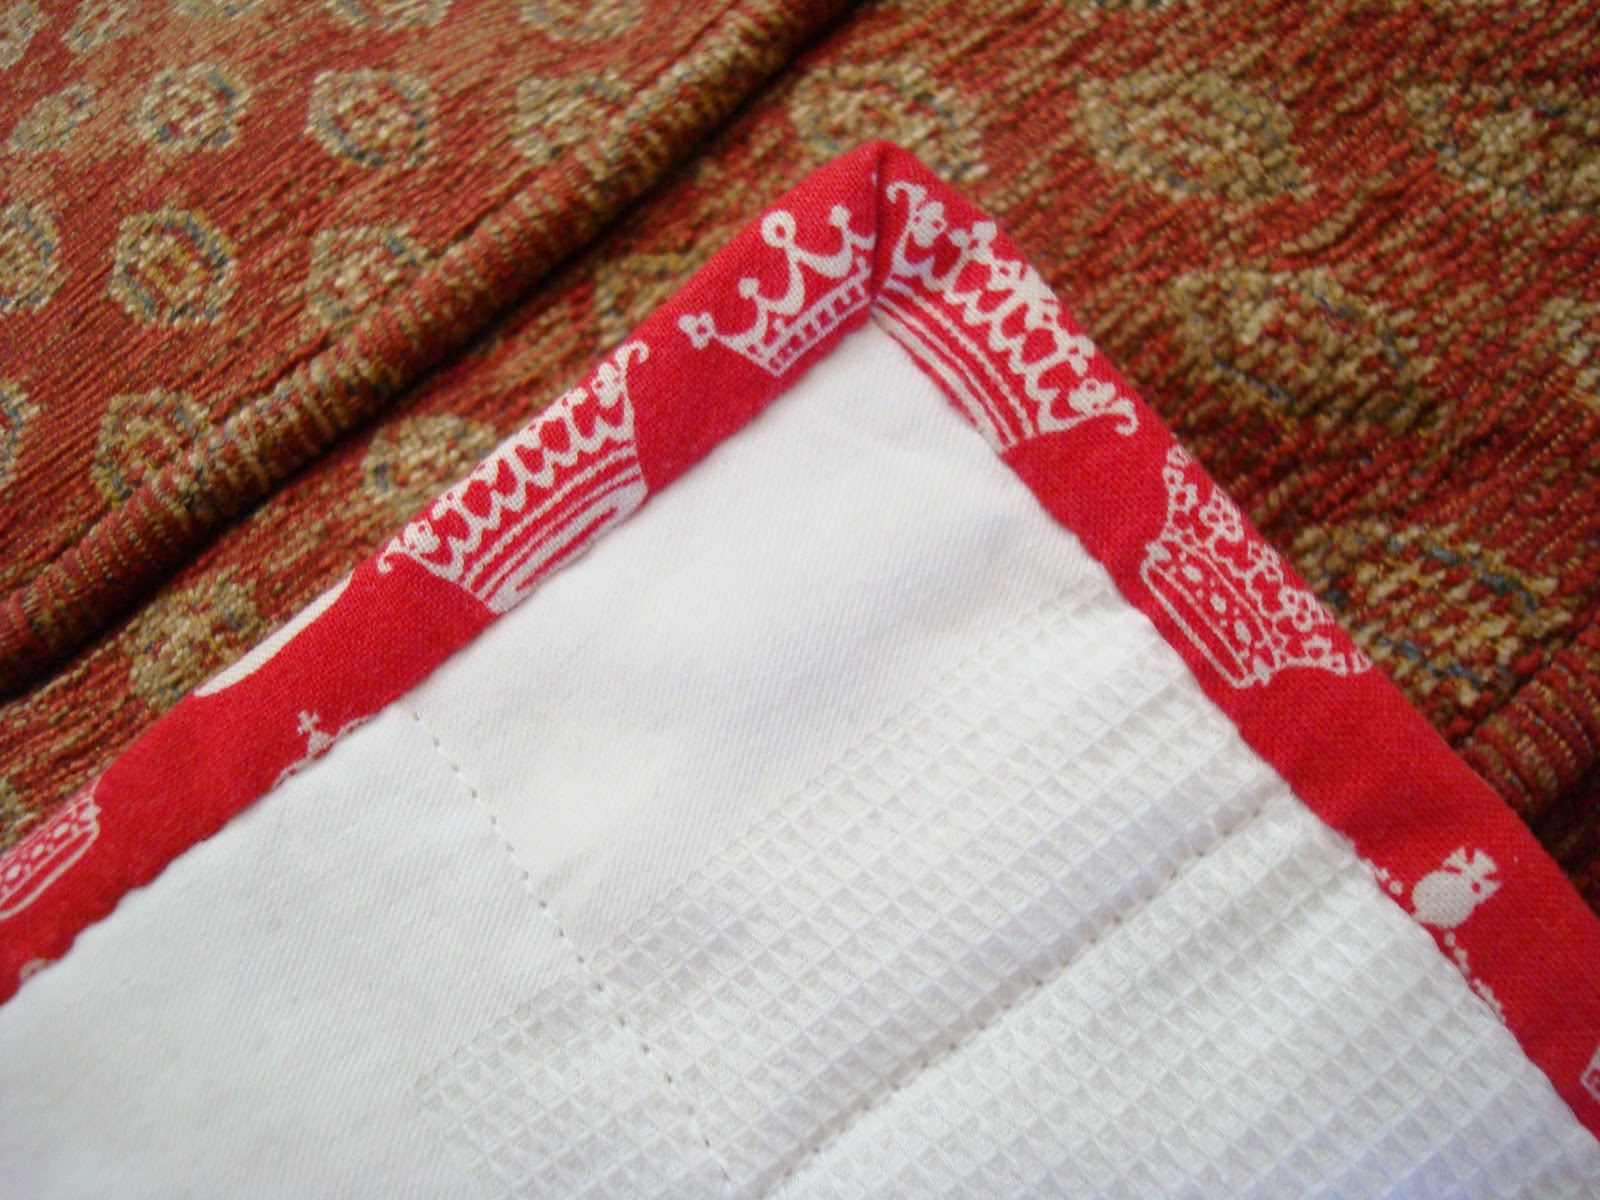
    How's that for a mitre?
    I am particularly pleased with the way the mitred corners worked out.  I am indebted to Lizzie Lenard's tutorial on binding.  The finish on this quilt is about a hundred times better than on my first quilt at the end of last summer.

    Well that's another project completed.  I will need to wash the quilt before I post it off to it's new owner.  I now have the excitement of starting a new project.  I wonder what's next...

    Monday 6 May 2013

    The Log Cabin Quilt: Quilting in the Ditch


     Well where has the time gone?  Over two weeks since my last post.  The Log Cabin Quilt should probably be finished by now but alas it is not.  Here it is as of this morning.


    And here are two more shots, of the backing, which I think show up the quilting slightly better.  I quilted in the ditch between each log cabin block and then the border.  My certainty left me at that point.  I then decided to to quilt in the ditch between each pair of piano keys in the border.  I think that overall the quilting feels quite balanced at this stage.  


    I was toying with the idea of adding diagonal quilting across the centre log cabin section of the quilt but after some discussion with The-Much-Beloved I have decided not to.  We both agreed that additional diagonal lines might detract from the detailed patchwork of logs.


    At the moment the quilt feels robust enough to stand up to wear and washing.  The batting suggested quilting up to ten inches apart.  The widest point between rows of quilting on this piece is seven inches so I am well within tolerances.  At the same time the quilt is still supple and flexible cuddly.  This is intended for a cot so I wouldn't want to over quilt and end up with something that felt too rigid.

    In an attempt to focus on the finish line here are the next steps

    1. Machine baste around the outside of the quilt a quater of an inch from the edge of the quilt top
    2. Trim away the excess backing and batting and square up
    3. Cut two and a half inch strips of the red fabric for binding
    4. Join strips using 45 degree seams
    5. Attach binding
    6. Wash, line dry and press

    Sunday 7 April 2013

    The Log Cabin Quilt: Pieced and pressed

    It feels like it has been a long time coming and I know that I still have a way to go.  Nevertheless I cannot help feeling that I have crossed a personal rubicon this evening.  I have finished piecing the log cabin quilt top.


    The top is now 42 inches wide and 56 inches long.  I think this will be a decent size for a cot plus a little bit of growing space.

    I finished the borders on the Singer 201K.  I am still quite new to the treadle but I managed the long seams reasonably well.  The large level workspace is a bonus.  I only had one sticky moment when I upset the apple cart by letting the machine run backwards.  Result?  - Great wads of top thread knotting up on the underside of the work - this is to be avoided.  I had to stop, cut the work from machine and unpick the mess before I could continue.

    So now it is time to think about putting the 201K to bed for a little while and introduce the Singer 401G.  That's the machine I am going to use to straight-line quilt this project.  But for now I think I've earned a beer.


    Tuesday 2 April 2013

    The Log Cabin Quilt: Every Last Scrap

    A long break from sewing over Easter but I am back in business now with a borrowed camera.  Last time I said I was nearly out of white fabric to finish the piano key border.  After another frantic search through the scrap box I turned up these.


    They are the cuffs from one of my old shirts.  Most of the shirt has now been turned into log cabin blocks and piano keys.  Each cuff is double thickness so, between them, there is quite a bit of fabric here.  The middle piece of fabric is in fact bias cut interfacing so it will not be used in the quilt.  I will save it just in case it can be used for something else at some point.  The dark line on the fabric nearest the camera is actually the table showing through a very worn strip.


    The cuff has yielded five more piano keys for the border.  I could only get two out of the piece with the worn strip.  I pressed and spray starched the fabric before cutting out the piano keys.


    I have one more cuff to "process" and if I run short again I still have the collar as a last resort.

    This is how I have decided to solve the problem of my corner stones.


    I am happy with this effect.  It feels like these are going together more easily than mitred corners (which I used on my first ever quilt) and I like the way that the stepped strips continue as a variation on the log cabin theme.

    I am setting myself the personal target of having this quilt top finished by the weekend.

    Wednesday 27 March 2013

    The Log Cabin Quilt: Sashing and Border update

    Here are the log cabin blocks pieced together in the sunshine and shadow setting. All the paper foundation has been removed [with the help of TMB - thanks!] and the narrow red sashed border added.  I think I like it... 

    Spot the toe of my carpet slippers! 

    Production has switched to the 201K.  The 28K's bobbin ran out on Saturday afternoon and I already had a class 66 bobbin wound with white thread.  The large level work space of the 201K's cabinet made the long seams more manageable. Does anyone else ever switch machines part way through a project?

    Here is the quilt top a few minutes later with the first long side of piano keys added.  The border has been pressed and the quilt is making me smile.


    Next job is to make another long piano key border for the other side but I may get distracted working out how I am going to handle the corner blocks.  I'm not sure I have the strength for mitred piano keys.

    Tuesday 19 March 2013

    The Log Cabin Quilt: Progress

    Here are the log cabin blocks I have made laid out on the sitting room floor.  No design wall for me.

    Log cabin crib quilt

    Log Cabin Blocks

    Now when I started piecing these I didn't really know what I was making.  I started the green log cabins as an experiment in paper foundation piecing.  I have now made 24 log cabin blocks. That's four blocks in six different colours.  Having done this I feel that I have made as many log cabin blocks I as would like to for the time being.  I think I am tired of sewing, fabric I can't see, through a sheet of paper.

    Each of my 24 blocks will finish at seven inches square so at the moment I have a potential width of 28 inches and length 42 inches.  I think I have two options.

    1. make another 24 blocks and to create a quilt top 42 x 56 inches
    2. take what I have and use borders to bring the quilt top up to a similar size
    I have decided that I am going to go with the second option.  Thinking about borders and my small fabric stash some kind of pieced 'scrappy' border is going to the answer.  I used piano keys for the border on my first ever quilt and enjoyed making them and the finished look of them.

    Having looked at the scraps I have available I think I am going to use the red from the middle of the log cabins to add a narrow sashing border around the outside of the 24 log cabins.  Then I am going to use strips of the printed fabric, alternating with strips of the remaining white, to make the piano key border around that.  I am hoping that the red will frame the  log cabins and that the alternate white strips will prevent the outer border from over powering the centre blocks.  We will see.

    Chain Piecing with the Singer 28K - Note the seam guide set for a scant quarter inch

    Here I have started chain piecing one and a half inch strips to make the border.  This is the first time I have used this technique and I like the way it seems to save time and thread.

    Pressing Chain Pieced Piano Keys - please excuse my ironing board cover.

    These piano keys waiting to be snipped apart and trimmed open.

    Making a decision about where this quilt top is going next has reawakened my interest and excitement in this project.  I am already thinking about what style of quilting will suit this patchwork.

    Monday 4 March 2013

    More on the Log Cabin Blocks

    This is one of my completed paper foundation pieced  log cabin blocks.  Note the wide, uneven, margin of paper all around the outside of the fabric.  Although the foundation will remain in place until I join the blocks together I fear this wide margin will make that joining near impossible.


    This is the same block flipped over so that the paper foundation shows.  That uneven margin will need to be trimmed to the same width on all of the blocks.


    I line the first quarter inch mark on my ruler up with the printed outline on the foundation and trim with my rotary cutter.


    I can then join matched blocks in the manner of a four patch unit by sewing along the printed line on the foundation, nesting the seams in the way that I have been taught.  Here are the first two blocks of a four patch coming together.  Note the neat narrow margins on the foundation pieces which give the quarter inch seam allowance I am looking for.


    Here is a complete unit.  Colour matched log cabin blocks sewn as a four patch block in a setting that I have seen called sunshine and shadow.  Only a few more to go before I have something nearing the size of a cot.


    Wednesday 27 February 2013

    Piecing By Numbers with the Singer 28K


    This is a technique I am trying to teach myself from instructions I found on the internet.  It's sometimes call Paper Foundation Piecing and I've also seen it referred to as Stitch and Flip.


    I start each block with a paper foundation.  I designed this simple log cabin foundation using the table function which is part of word processing software.  If you look closely at the photograph you can see that each piece of the block has a number starting with 1 in the darkest square at the middle of the foundation.  The shading on my paper foundation is a nod to what I have read about the tonal values of traditional log-cabin blocks.

    The next step (for my block) is to cut some fabric.  The blue is the left overs of some super smooth shirting I picked up online very reasonably and the white is from one of my shirts whose collar and cuffs were past their best.  I have started to cut one and a half inch strips half an inch longer than pieces on the foundation.  This gives me my quarter inch seam allowances.

    Here I have flipped the paper foundation   and pinned my first piece of fabric over the back of the correct section.  I hold the paper up to the light to help me centre the fabric.  Notice that I have used red for the centre.  The story goes that the middle square of the log cabin block is supposed to represent the hearth of the cabin and so it is often red to indicate that fire that would have burned there.  I like a good story don't you?

    Here I have layered the number two piece of the fabric on top of the first.  The next step is to flip the paper foundation back over and carefully carry it to the sewing machine without anything shifting.  Next time I will layer first and  then pin I think!

    Singer 28, Singer 28K, threaded

    My lovely 1899 Singer 28K

    This is where I start and where I finish.  I aim for about a quarter of an inch before and after the outline on the foundation.

    I then continue adding strips, pressing with a dry iron as I go, following the numbers and tonal value already printed on the paper foundation.  When finished the block looks like this:

    Nice?

    The paper foundation stays with the completed block until I am ready to set the blocks and piece them into a quilt top. At the moment each block takes about an hour to piece (including cutting time) so I suppose I am some way off that.